Communication ChannelsEmail Integration Setup
Gmail Sync / OAuth
Steps to setup your business gmail account in Chakra Sales CRM to manage business communications.
Overview
Sync your gmail with Chakra Sales CRM to manage business communications within Chakra Sales CRM in an integrated manner
- Receive Email
- Send Emails
- Create or Update Leads based on email triggers
Gmail Sync
Access Email Inbox
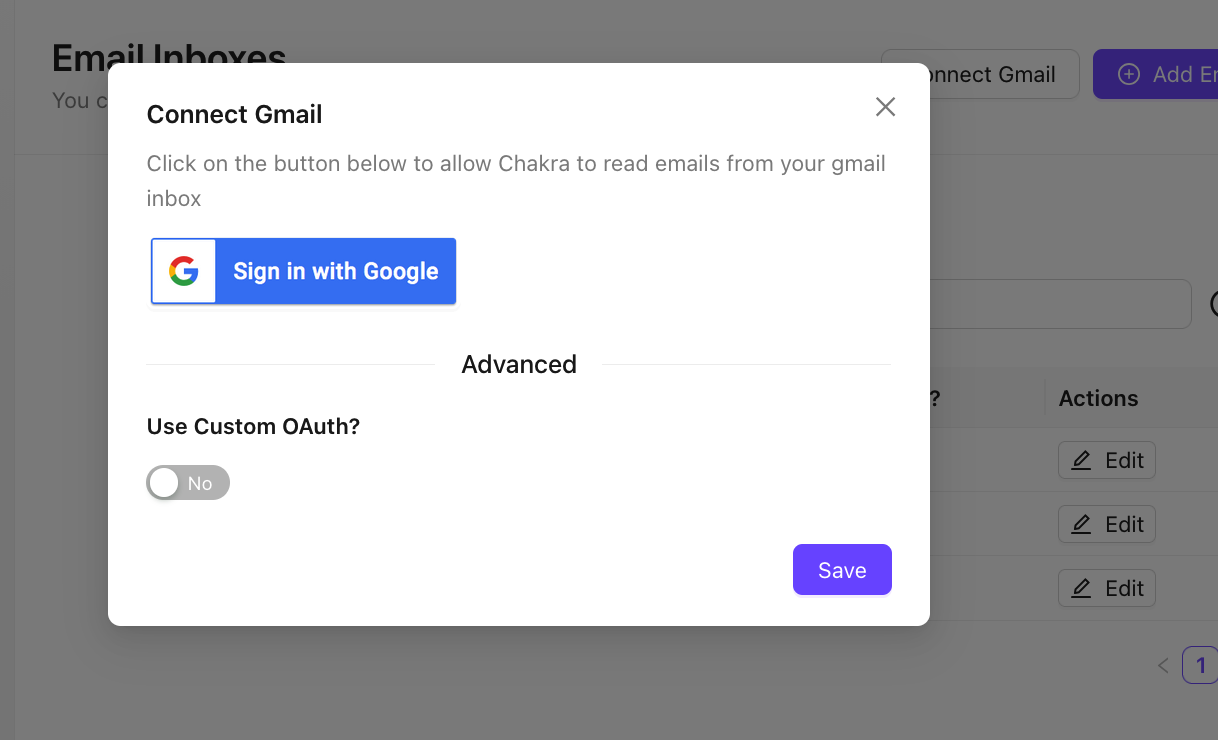
- Go to Email Inbox settings
- Click on
Connect Gmailbutton to read your incoming mails in gmail
⚠️⚠️ Note: An authorized user with Gmail access is required to setup the Gmail sync. The user has to provide Chakra necessary permissions to authorize gmail sync setup.
Connect Gmail (3 Steps)
- Click on
𝐆 Sign in with Google Choose an Accountby clicking on the email in gmail widget- Provide Necessary Permissions (~13). Click
Continue
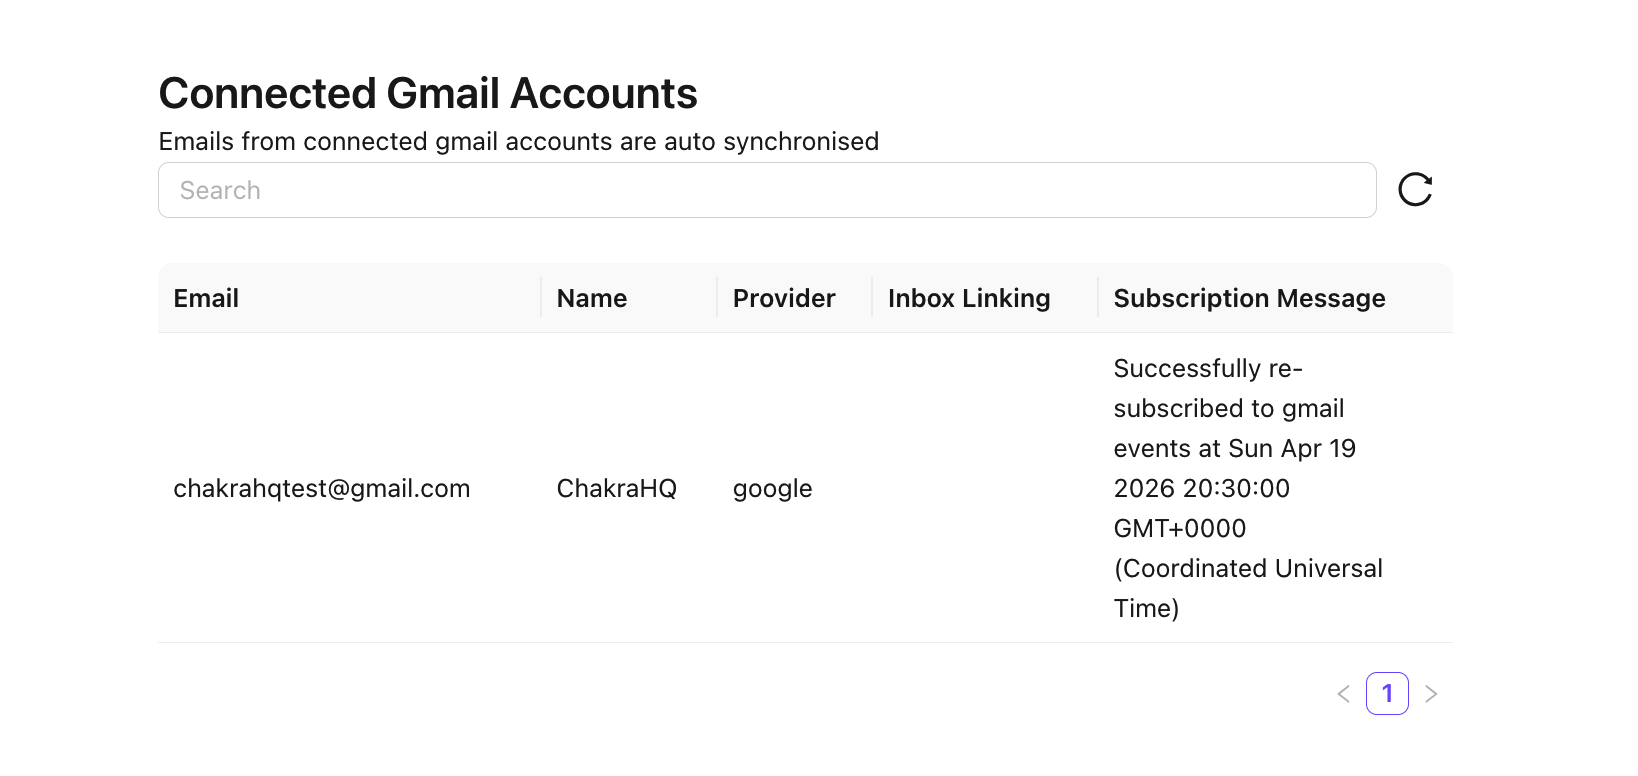
Connected Gmail Account
- The connected gmail will reflect in the Connected Gmail Accounts section
- Check Subscription message for the current sync status
Setup Gmail via OAuth
You can use Your own OAuth to connect your gmail account. Please follow the steps below.
Setup Google Cloud Project
- Sign in to the Google Cloud Console
- Create a new project by name "ChakraHQ Gmail Connect" and select the same
- Open the left nav bar from top-left icon and Select "APIs & Services"

- Click Enable APIs & Services

- Search for and select "Gmail API", Click Enable

- Go back & Click Enable APIs & Services again
- Search for and select "Cloud Pub/Sub API", Click Enable

- Search for and select "Google People API", Click Enable
Set up OAuth consent screen
- Go back to home screen of "APIs & Services"
- Open the left nav bar from top-left icon and click "OAuth Consent Screen"

- Click "Get Started" from the overview screen

- Under Project configuration > App Information
- Enter App Name as "Your BusinessName Gmail Connect"
- Select/Add a User support email
- Click Next

- Under Audience
- Select Internal
- Click Next

- Under Contact Information
- add a contact email address(es)
- Click Next

- Under Finish
- Click and check the Google API Services data policy
- Check "I agree to the Google API Services data policy"
- Click CONTINUE
- Review all information and click "CREATE"
Create OAuth Client
- Select "Clients" from the left navigation bar

- Click "Create Client"

- Select "Web Application" under "Application Type"

- Name the app "ChakraHQ"
- Under "Authorised JavaScript origins"
- Click "Add URI
- Enter the url - "https://app.chakrahq.com" without quotes
- Under "Authorized redirect URIs"
- Click "Add URI"
- Enter the url - "http://api.chakrahq.com/auth/google-custom/callback" without quotes
- Click "CREATE"
- you should see the newly created client listed under "OAuth 2.0 Client IDs"
- Click the newly created client to show its details page
Configure Pub/Sub Topic
- Search for Pub/Sub in the top search bar and select the same

- Click "Create Topic" from the top bar

- Under Topic Id enter "gmail-listener" without quotes

- You will be redirected to the topic page
- Here click "Create Subscription" under Subscriptions
- Under Subscription ID, enter "gmail-webhook" without quotes

- Under Delivery Type, select "Push"
- Under Endpoint Url, enter "https://api.chakrahq.com/v1/ext/external-email-account/custom-gmail-events" without quotes

- Under Retry Policy, Select "Retry after exponential backoff delay"

- Click "Create"
- Now you need to provide permisssions to Gmail to this topic
- Click "Topics" from the left hand nav
- Click the "gmail-listener" topic to go its details page
- On the right sidebar, locate the "PERMISSIONS" tab
- Click "Add Principal"
- This will open a principal creation drawer
- Under "New Principals" enter the address - "gmail-api-push@system.gserviceaccount.com" without quotes
- Under role, search for "publisher" and select "Pub/Sub Publisher"

- Click "Save" to save these permissions
Setup Custom OAuth in Chakra
- Go to app.chakrahq.com and login if not logged in.
- Ensure you have admin privileges
- Go to Admin > Email Inboxes
- Click "Connect Gmail" from the top right corner
- Toggle the switch named "Use Custom OAuth?"

- Now enter the required information
- "clientId"
- You can obtain this information from the OAuth client page created in the earlier step
- "clientSecret"
- You can obtain this information from the OAuth client page created in the earlier step
- "Project ID"
- Go to Google Cloud Home
- Select the project created in the earlier steps
- You should see the project details as shown in the screenshot below
- Copy the "Project ID" value

- On Chakra Gmail OAuth Configuration page
- Click "Save"
- Refresh the webpage
- Click "Connect GMail"
- Click the "Sign in with google" button now
- Complete the connection steps